Showing posts with label Sewing. Show all posts
Monday, 3 July 2017
Cosy lion
Just to break up the posts from our Northumberland holiday, I thought I'd quickly show you one of my latest makes, a cafetiere cosy.
The pattern is from this book, Super-cute felt by Laura Howard, which I was lucky to find in a charity shop. There are loads of lovely projects but the lion was the one which immediately caught my eye.
I love using felt as it's so forgiving and doesn't fray all over the place. I particularly enjoyed the little bits of stitching which gave the lion some character. And, of course, all the star sequins: the older I get the more sparkle I seem to like :)
A really quick and easy make which was just what I needed in the long haul to finishing my latest quilt.
Back soon with the cookery challenge. x
Sunday, 15 February 2015
Mug hugs
Last week was my quilt group's meeting. Every year the committee put together an annual programme and they're always looking for members to do demos or run workshops. It's a few years since I volunteered so, this time, I offered to run a workshop on mug hugs - a little cosy to keep your tea or coffee warm in the winter.
To give me plenty of time, I asked to be put on towards the end of the year. It therefore came as a bit of a surprise when I found out just before Christmas that I'd been pencilled in for February! I hadn't even made a mug hug at that point. Gulp!
After a few deep breaths, I made a couple of prototypes. The problem with ones you can buy in the shops is that they're usually far too big. They come right up to the rim of your mug so that you get a mouthful of fuzz every time you take a sip. I designed mine to be lower and only provide half a hug - decorative but still cosy.
Originally, I planned to use ribbons as the fastening but they were too fiddly to tie and I thought they'd keep getting in the way of the handle. I'd used loops and buttons on my coffee pot cosy so I tried something similar with hat elastic. Perfect.
As we were going to be sewing during the meeting, the design needed to be simple and able to be sewn by hand in about an hour - well, at least part of it. It was an easy decision to choose felt as the main fabric as it doesn't fray and is nice and woolly and warm.
I played around with a couple of ideas. First was a simple striped design using the stitch and flip method. A strip of rick-rack and more felt tidied up the raw edges. This is my friend's favourite.
Then an even simpler idea with flowers and a fancy trim. The flowers here were ready-made but would be easy to replicate. This was the design I decided to use as I also wanted to make up packs of materials for the group and this was the easier option.
I made up 20 packs with all the materials to make the mug hug: this worked out at about £1 per pack. There was a choice of either pink or purple (the back and the ribbon) and I included 10 different squares of felt so that they could choose which to use for the flowers. The trickiest part was counting out 25 seed beads for each pack - thank goodness for tweezers!
And how did it go? I thought it went really well. I had all my step-by-step samples and some other ideas from magazines and the internet. Everyone seemed interested and they laughed in the right places, always a good sign!
In the end, most people chose to take a pack away rather than sewing during the meeting, though a few did cut out their flowers. I can't wait to see the finished mug hugs next time.
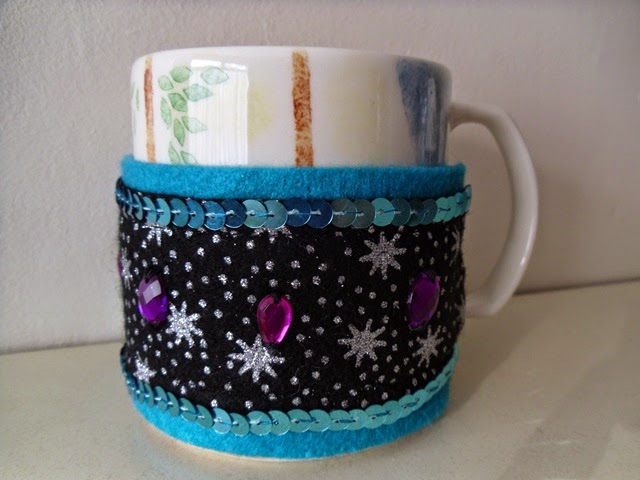
It's such an easy pattern and can be decorated lots of different ways. This is Chickpea's version, all sparkle and bling! If you'd like to make your own, here's how...
To make a mug hug, you will need:
2 strips of felt, 2.5" x 10"
Scraps of felt for the flowers
25 seed beads
2 x 5" lengths of hat elastic
2 x 10" lengths of ribbon
2 buttons
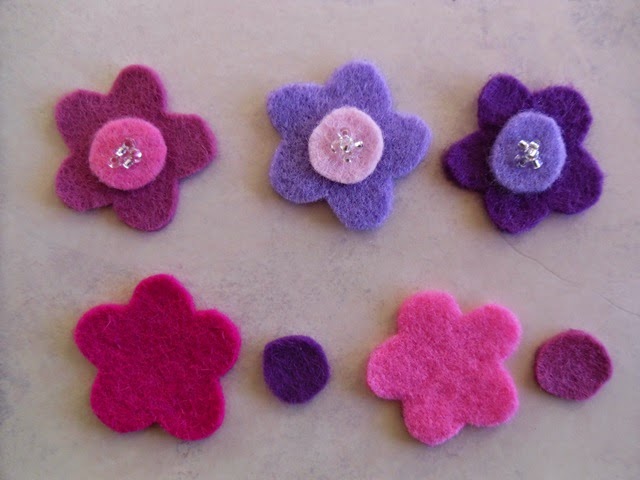
Make 5 flowers: each flower contains 1 flower shape, 1 small circle, 5 seed beads. If you don't have any beads, you could just use small buttons as in the example below.
Sew the flowers to the grey strip of felt, leaving a 1" space at one end for the buttons and a 1/2" space at the other for the elastic loops.
Sew the grey and coloured strips together along 3 sides, leaving the side for the elastic open.
Make 2 loops with the elastic - make sure the knot is near the end. Insert in the end of the mug hug.
The knot needs to be inserted far enough so that you can sew 2 rows of stitching in front of it. This part is definitely best done on a sewing machine to make sure the elastic is firmly secured.
Sew ribbon along the top and bottom edges. Then sew on the buttons.
Attach to your mug and enjoy! I'd love to see your version if you decide to make one.
It's been a crafting week as it was also the first meeting of a knitting and crochet group at work. Everyone had a great time oohing and ahhing over each other's projects so we're now planning monthly meetings.
I've also been working on another project and will share that with you next time. Enjoy the rest of your weekend. xx
Sunday, 2 February 2014
February's fair maids
After making the Remembrance Day poppy and the Tudor rose for Lancashire Day, I thought it would be nice to make a different brooch to mark the changing of the seasons and traditions. It's taken me a while to get around to it but the snowdrops growing in my parents' garden gave me the inspiration.
At first, my plan was to make something 3D in felt which, in my fantasies, would have looked something like these gorgeous examples by CozyFelt (left) and Olga Voloshchenko (right). Sadly though the reality of my skills meant I had to aim for something simpler. I played around with felt and fabric for a while but nothing looked quite right. Back to the drawing board and to cross stitch.
I found a pattern in my magazine stash and settled down last Sunday with a cup of tea and a couple of pieces of Scottish tablet to stitch.
And this was the result! I tried lots of different settings but this simple border of green and white felt worked the best. There's a couched silver thread around the linen to give a touch of sparkle. Not what I envisaged at the start but I'm pretty happy with it.
That wasn't the end of the snowdrops though.
While looking for ideas and patterns, I came across lots of information about snowdrops, including this lovely, little poem by Alfred Lord Tennyson.
Many many welcomes,
February fair-maid,
Ever as of old-time,
Solitary firstling,
Coming in the cold time,
Prophet of the gay time,
Prophet of the May time,
Prophet of the roses,
Many many welcomes,
February fair-maid!
I thought it summed up beautifully the hope and anticipation that these first flowers of the year bring.
The snowdrop, in purest white arraie,
First rears her hedde on Candlemas daie
I also discovered that today is Candlemas Day when a blessing of the church candles for the coming year would have been held. Snowdrops are also known as both Candlemas bells and Mary's tapers. You can see in this photo how they might have come by the latter name as they push their flame-like white tips into the light.
Candlemas marks the midway point between the Winter Solstice (shortest day) and the Spring Equinox (20 March) and coincides with the pagan Celtic feast of Imbolc. As you know, I love a good tradition and don't want to miss an excuse for feasting, so I thought it would be fitting to mark the occasion with something to eat.It wasn't hard to find inspiration in that humble staple, milk. Imbolc translates as 'ewe's milk' and the scientific name for snowdrops, Galanthus, comes from the Greek for milk (gala) and flower (anthos). As I've had a bit of a poorly tummy this week, a warm milky pudding sounded just the thing. I did consider making galatopita (being Greek and milky) but instead settled on that English classic, rice pudding, laced with a splash of amaretto.
Who would have thought that the simple little snowdrop could provide so much inspiration?
Before I go , I have one last traditional saying.
If Candlemas Day be fair and bright
Winter will take another flight.
If Candlemas Day be cloud and rain
Winter is gone and will not come again.
I don't know what it's been like in your corner of the world today, but here it's been a beautiful sunny day. Looks like we're in for a long winter :(
***************************************
Do you ever find that some posts come together really easily and others you have to labour over? This is definitely the latter. I had such a mix of ideas and inspiration it was hard to bring that muddled mass together. I hope I got there in the end. x
Tuesday, 15 October 2013
Collaring a dress
I thought I'd share with you something different after all the 'visit' posts. Several months ago I bought this dress and, although I loved the bicycle pattern and the colour, I did think it was a little plain.
I knew immediately that it would look good with a crochet or lace collar. These proved more difficult to track down than I thought but I did eventually find some in Abakhan. Not exactly what I'd envisaged but very pretty and an absolute bargain price of 50p for both!
And this is how the dress looks now. It took a couple of attempts to get the collar to lie flat but I'm really happy with the way it's turned out. I'd worn it a few times before sewing on the collar with no reaction. However, every time I've worn it since, I've had lots of positive comments - even my Mum noticed! It's amazing how much difference a little change can make :)
Saturday, 12 January 2013
Button brooches
It was a craftier Christmas than usual as I made presents for two friends this year. As well as knitting a scarf, I made button brooches. Both were inspired by this simple brooch I made for myself some time ago. Three buttons were stacked and secured by cord through the button holes. A brooch bar was sewn to a circle of felt and the felt glued to the back of the largest button.
After playing with felt flowers here and here, I decided to incorporate both ideas for the presents.
The first brooch was made to match the Galaxy scarf. I was pretty sure Sue would like it but, to test the theory, I wore my own when we met up. Success! Not only did she admire it but she asked how it was made.
And this is Sue's brooch. Her favourite colour at the moment is lime green so that gave me the contrast colour to go with the purple of the scarf. She likes big and bold accessories so I was sure this would fit the bill.
As the buttons on this one seemed quite heavy, I added some extra stitching to attach the buttons to the felt backing to give it extra strength.
The second brooch was made to match this red and silver ruffle scarf which I made Gill for her birthday. The yarn is Rico Can Can Glitz. There's a lady who makes ruffle scarves to raise funds for the church so I think everyone in our village owns one of these!
A different colour scheme and a slightly simpler design which Gill will prefer. I think this one was my favourite. Which is yours?
*****************************************
It's been a quiet day of the usual domestic stuff: supermarket shopping, washing/drying/ironing, cleaning the car. I've also been transferring my files onto USBs as my PC is showing signs of being on its last legs - it's started to forget what day and time it is. I do that all the time too but I think it's more serious in a PC! Can't complain really as it is about 14 years old so is ancient in technology terms.
Tomorrow we're going to see Les Miserables at the pictures. It's Dad's favourite musical though I've never seen it and the reviews have been good. Enjoy the rest of your weekend. x
Wednesday, 28 November 2012
Lancashire rose brooch
Last time I told you about Lancashire Day and mentioned the rose brooch I'd made. The idea was inspired by the poppy I made for Remembrance Day from the pattern by Tally.
The symbol and County flower of Lancashire is the red rose and dates back to at least Tudor times. There are many interpretations used in company logos but I wanted something traditional.
For my first attempt I enlarged a picture from the internet and traced around it to create templates. It's pretty but the petals felt too rounded to be reminiscent of a Tudor rose. I tried another image but the petals were too uneven and it was difficult to get the layers to line up. There was only one thing to do - draft my own pattern.
Using a round protractor, I drew a circle and divided it into 5 equal segments for the 5 petals: each segment is 72 degrees. I then drew an inner circle to the size I wanted the finished brooch to be. The petals were drawn freehand so are not completely the same but are at least spaced evenly. I kept measuring each element to keep them as uniform as possible.
Once the pattern had been drafted, I traced around each component to produce separate templates for the 4 layers. For the second sample, I decorated the petals with some simple stitching before sewing the layers together.
Ta-dah! And this is the finished brooch! This is my favourite and the one I wore. Others have preferred the simpler, stitch-free, rose. Which is your favourite?
PS I had planned to share the templates with you but it's proving more difficult than I thought to load up the pdf. For now, here's a photo of the templates which you could enlarge. If I ever figure out how to load up the templates, I'll attach it here.
Sunday, 11 November 2012
Poppies for Remembrance
When I made these knitted flower brooches last winter, one of the girls at work suggested they would make good poppies for Remembrance Day. It seemed a good idea and I agreed to make a poppy for each of us. However, when the time came, I didn't feel like making the same pattern again, so I started to look for an alternative which would look more like a Remembrance poppy.
The girls were really pleased and wanted to pay me for the cost of the materials. However, by coincidence, the day I handed them over was the launch of the Poppy Appeal so I asked them to give a donation to the Appeal instead.
I searched the internet for free knitted or crochet patterns but the instructions were either difficult to follow or just didn't look right. Back to the drawing board but this time I searched for felt or fabric flowers instead. And that's when I hit lucky with this pattern by Tally. I've adapted it slightly by adding a leaf but as you can see from the components it's really simple and her instructions are very clear.
Ta-dah! This is the finished poppy. The hardest part was getting a decent photo. It must be something to do with the way the light bounces off the felt but I just couldn't get a true representation of the colour. In reality they're a much richer red than this and the green is a dark forest green.
The girls were really pleased and wanted to pay me for the cost of the materials. However, by coincidence, the day I handed them over was the launch of the Poppy Appeal so I asked them to give a donation to the Appeal instead.
The idea of using layers of felt shapes to make flowers was so simple and so effective that it's got me thinking of ways to adapt it for other flowers. In fact, there's a celebration in a couple of weeks for which it would work beautifully and I've already started making a sample. Fingers crossed it turns out ok and I'll reveal all - watch this space!
Subscribe to:
Posts (Atom)


