Showing posts with label Cakes. Show all posts

Friday, 14 April 2017

Blueberry and amaretti cake


It's been a while since I shared a recipe but I did promise to share this one for Blueberry and amaretti cake if the taste was as good as it smelled when baking. It most definitely was: moist, almondy, sweetly fruity - mmmm!

The cake was inspired by a couple of things. First, I had a bag of amaretti biscuits in the cupboard which needed using up. You know, one of those ingredients which are on special buy in a supermarket and end up in your trolley because you'll have so many uses for them. Then they spend a year in the back of the cupboard until the expiry date has gone by. Second, I wanted to used the new bundt tin I got for Christmas.

I searched through my books but couldn't find just the right one, though two cakes in my favourite Clandestine Cake Club Cookbook had the kind of idea I was looking for: the Blueberry, peach and amaretto and the Dark chocolate and amaretto. I've made both of these in the past and both are absolutely delicious. Here then is my combined version. Enjoy :)


Blueberry and amaretti cake

150g self-raising flour
100g amaretti biscuits, finely crushed
50g caster sugar
150g blueberries
4 eggs
200g melted butter
2tbsp amaretto

1. Mix together all the dry ingredients, including the blueberries.
2. Melt the butter and leave to cool slightly before adding the eggs and amaretto. Mix well.
3. Combine the wet and dry ingredients.
4. Pour into a baking tin.
5. Bake in an oven on 190C/170C Fan/Gas 4 for about 35 minutes until a skewer comes out clean. It may take longer in a conventional cake tin. If you use a bundt tin, leave to cool in the tin. Otherwise, leave to cool for a few minutes and then turn out onto a rack.
6. Dust with icing sugar to serve.


Thursday, 5 May 2016

Bananas and custard cake


I read somewhere that bananas are the fruit most often thrown away and that's definitely the case in our house. I'm fussy about my bananas. They have to have only just turned yellow or even still have some green on them. As soon as brown spots appear and they smell like banana, they are destined to stay uneaten in the fruit bowl.

At the weekend I had a couple which had been lingering in the bowl for some time. They weren't just spotty, they were completely black. I hate to throw food away though and I fancied some Bank Holiday baking. After thinking of a few combinations, bananas and custard appeared as the complete favourite. I couldn't find the right recipe though so ending up adapting a couple from the two Clandestine Cake Club books*.

It was so easy to make and so delicious! The only thing I'd change would be the decoration. I took the lazy option in plonking some dried banana pieces on top. Next time I think I'd use icing.

If you'd like to have a go yourself, the recipe is below. We'll be eating a different kind of cake today though as it's my daughter Chickpea's birthday! We're going for afternoon tea at a French patisserie - very posh - and there'll be birthday cake later. Happy birthday to my (not so) little girl :)


Cake

200g unsalted butter, very soft
200g caster sugar
4 large eggs, beaten
2 small, very ripe bananas, mashed
1tsp vanilla extract
175g self-raising flour
3tbsp custard powder (not instant)

Filling

250ml milk
1tsp vanilla extract
3 large egg yolks
75g caster sugar
25g cornflour
1-2 fresh bananas, sliced

To make the cake:
  • Preheat the oven to 190C/Fan 170C/Gas 5.
  • Grease and line two 8"/20cm sandwich tins.
  • Put all the ingredients in a food processor or mixer and blend. This makes a slightly denser cake so, if you prepare one that's lighter and fluffier, use the creaming method, adding the bananas at the end.
  • Divide evenly between the two tins and bake for 15 minutes or until a skewer comes out clean.
  • Leave in the tins for 10 minutes before turning out onto a wire rack to cool completely.

To make the custard:
  • Heat the milk and vanilla extract in a pan until hot. Remove from the heat.
  • Whisk the egg yolks and sugar until pale and creamy, then whisk in the cornflour.
  • Pour the milk over the egg mixture, whisking continuously.
  • Pour everything back into the pan and heat, again whisking continuously. Don't leave it alone as it will suddenly thicken. Once thickened, take off the heat and pour into a bowl. Put some clingfilm over the surface to prevent it forming a skin. As soon as it's cooled, you can pop in the fridge until you're ready to assemble the cake.

To assemble the cake:
  • Spread the custard generously over one of the sponge halves - you might not need all of it.
  • Put the slices of fresh banana over the custard.
  • Put the other sponge half on top.
  • Decorate how you choose. I just put a few dried banana slices on top but you could dust with icing sugar, or cover with icing (maybe coloured yellow).


*The cake was adapted from the Rhubarb and Crumble cake in A Year of Cake. The custard is from the Manchester Tart cake in The Clandestine Cake Club Cookbook.

Wednesday, 8 October 2014

Carrot, coconut & caraway cake


We've just watched the final of Great British Bake Off so I thought I'd share a cake I made a few weeks ago. I had a few half-dead carrots which needed using up. Yes, I could have made soup or something healthy but cake sounded better!

I didn't want to make a standard carrot cake, though I did use the basic carrot cake recipe from The Great British Bake Off: How to Bake book for the proportion of ingredients. A rummage in the cupboard for flavourings uncovered some desiccated coconut and caraway seeds: the 3 C's of Carrot, Coconut and Caraway had a nice ring to it and so, the cake was born!

It's a thin traybake but that's only because my tin was a little too big. Why is it that I never have the right size despite having a cupboard full of tins?? Not that it made any difference to the flavour. I'd say it tasted even better the day after when the caraway flavour really had time to develop.

The cream cheese frosting caused me a few problems as it just wouldn't set, no matter how long I left it to chill in the fridge. In the end, I abandoned that batch and made another using a different brand. I was also careful not to over mix. The result? A perfect consistency. I'm not sure what the moral of the story is except that I'll use the expensive brand (Philadelphia) next time rather than the supermarket's own!

Hope you enjoy. x


Carrot, coconut & caraway cake

For the sponge:
225g self-raising flour
1tsp baking powder
pinch salt
50g desiccated coconut
1tbsp caraway seeds
1tsp ginger
grated zest of 1 lemon
200g light brown muscavado sugar
150ml sunflower oil
3 large eggs
juice of 1/2 lemon
300g grated carrot

For the frosting:
50g soft unsalted butter
150g icing sugar
200g full-fat cream cheese
finely grated zest of 1 lemon
juice of 1 lemon

To top:
25g toasted desiccated coconut

1. Preheat the oven to 180C/160 Fan/Gas 4.
2. Put the flour, baking powder, salt, coconut, spices and lemon zest in a bowl. Add the sugar and mix well, making sure to break up all the lumps in the sugar - I used a potato masher.
3. Beat the eggs with the sunflower oil and lemon juice until well mixed and then add to the flour bowl with the grated carrot. Mix well.
4. Pour into a prepared baking tin and bake in the oven for about 40 minutes. When cooked, leave to cool in the tin for a few minutes and then turn onto a wire rack to cool completely.
5. Make the frosting: beat the butter until smooth and creamy. Add the icing sugar and mix well.
6. Add the cream cheese and lemon juice and zest and mix together until just combined. Be careful not to over mix. Chill in the fridge and spread on the cake when the cake is completely cold. Scatter with toasted coconut.

But what about the failed frosting? Well, I didn't like the idea of throwing it away so decided to repurpose it into cheesecake.


Some crumbled ginger biscuits were put in the bottom of a glass ramekin dish. I added 2 beaten eggs to the frosting recipe and the mixture was poured on top of the biscuits to about 3/4 full. For added flavour I put half an apricot in the middle and baked for about 25 minutes.

To be honest, it was a bit overbaked but was still edible and better than being wasted. x

Wednesday, 23 April 2014

By George and Will!


'Sit down and feed, and welcome to our table!' (As you like it, Act II Scene vii)

Today is St George's Day and also the 450th anniversary of the birth of Shakespeare. I need very little excuse for cake baking but this surely has to qualify.

While I was reading through Anna Del Conte's Classic Food of Northern Italy as part of my cookery book challenge, I came across a recipe for polenta and elderflower cake. Anna explained that the cake is eaten in Lombardy on St George's Day as he's also a popular saint in Italy - actually it turns out he's a popular saint in lots of countries.


Elderflowers seem so typical of an English summer that it seemed appropriate for celebrating Shakespeare's birthday too. Anna used real elderflowers but, as they're in short supply in England in April, I've adapted the recipe to use cordial. The other change I made was to use both coarse and fine polenta flour but that's just because I happened to have some in the cupboard: you could just use the coarse kind.

Another thing to note about this cake is that it doesn't have the dropping consistency you'd usually expect of a cake mixture. It's more of a dough and needs to be spread out in the tin. As a result, the cooked texture is quite dry and it's therefore mandatory to serve it in a big puddle of cream :)


Polenta  and Elderflower Cake

100g coarse polenta flour
100g fine polenta flour
100g plain flour
1.5 tsps baking powder
pinch of salt
125g caster sugar
100g unsalted butter, melted
1 large egg, beaten
2tbsp milk
elderflower cordial
icing sugar (optional)

1. Heat the oven to 180C/160C Fan/Gas 4
2. Mix the dry ingredients in a bowl. Add the beaten egg, melted butter and milk and mix well.
3. Butter and/or line a 20cm/8" tart or cake tin.
4. Put the mixture in the tin. Spread out and level with your hands or the back of a spoon.
5. Bake for 35-40 minutes until a skewer comes out clean and the top is golden brown.
6. Leave in the tin and pierce the top a few times with the skewer.
7. Make up about 100ml strong diluted elderflower cordial with hot water. Brush over the top of the cake. I did this part when the cake was cool and you can see in the photo below that the cordial didn't soak in very far - next time I'll use more cordial and do it while the cake is warm.
8. Leave to cool completely.
9. Optional: To decorate, mix together some icing sugar and undiluted elderflower cordial to a drizzling consistency. I made mine a bit thicker and put it in a piping bag to give a neater finish. Alternatively you could just dust with icing sugar.
10. Serve with cream.


Decorate with a St George's flag. This red and white checked bow was the closest I had!

Happy birthday Shakespeare! And Happy St George's Day to one and all! x

Friday, 21 February 2014

Spiced coffee cake


Last time I promised you something to go with your morning or afternoon brew. In issue 14 of The Simple Things magazine, there was a recipe for a spice mix which can be added to filter coffee. Chickpea and I fell completely in love at first taste and often have it as a weekend treat.

After a while though, I started to wonder what the spices might taste like in a cake. Given that they're added to coffee, it made sense that the cake should be a coffee cake.


I browsed through my books and magazines for inspiration and quickly decided it should have at least three layers. However, it was the frosting on the cappuccino cake which really caught my eye. I ended up using that recipe as the base on which to add my spices but tweaked both the recipe and the method. One of the alterations was to use more spoonfuls of coffee than specified as a number of people who commented online said the flavour needed to be stronger. Even so, the coffee flavour isn't particularly strong and comes through more in the frosting. Oh, the frosting! The yummy yummy frosting. In fact, forget the cake and just make the frosting!

I was so pleased with how the cake turned out and its gentle spicy warmth. It was really useful reading other people's experiences and tips on making the cappuccino cake recipe so, if you do decide to have a go at my spiced coffee cake, I'd love to know what you think and what you did to add your own twist. xx

Spiced coffee cake


Cake
250g unsalted butter
250g light soft brown sugar, plus 2 tbsp
300g self-raising flour
1/2 tsp ground cloves
Seeds from 10 cardamom pods, ground to a fine powder
1 tsp ground black pepper
1 tsp ground cinnamon
1 tsp ground ginger
1 tsp freshly grated nutmeg
4 eggs, beaten
150ml very strong black coffee, cooled

Frosting
500g mascarpone
3-4 tbsp light soft brown sugar
50ml cold strong coffee

1. Heat oven to 180C/160C fan/Gas 4. Butter and line 3 x 8" sandwich tins.
2. Beat butter and sugar together until pale and creamy.
3. Add the flour, eggs and spices and beat until evenly mixed.
4. Fold in 100ml of the coffee. I made mine in a cafetiere with 200ml hot water and 6 tbsp ground coffee.
5. Divide evenly between the 3 prepared tins and bake for 25 minutes or until baked.
6. Leave the cakes in their tins for a few minutes before turning out onto a wire rack. Add the 2 tbsp sugar to the remaining 50ml coffee and brush onto one side of each cake. Leave to cool and then put in the fridge overnight. The cakes will firm up and make it easier to spread the frosting.
7. To make the frosting, put all of the mascarpone in a bowl and beat with the sugar and the coffee. You may want to add more or less coffee and sugar to taste. The mixture will seem liquid at first but keep beating and it will firm up.
8. Spread a layer of frosting over 2 of the cakes and sandwich the 3 sponges together.
9. Spread a thin layer over the whole cake and put the cake back in the fridge to firm up. This is known as 'dirty icing' and will mean you end up with a crumb-free finish at the end.
10. After half an hour or so, spread the remaining frosting over the cake with a palette knife (I had some left but you might be more generous with your frosting!). Sprinkle with cinnamon and serve.

The cake will keep for a few days in the fridge but is best eaten at room temperature.

Sunday, 5 January 2014

Twelfth Night


Now, now the mirth comes
With the cake full of chocolate and almonds
Where a piece of macaroni's the sport here.

Begin then to choose
This night as ye use
Who shall for those present's delight,
Be Twelfth-day queen on this night.


Next crown a bowl full
With slices of apple mulled:
Add cinnamon, nutmeg and ginger,
With a bottle of cider too;
And if ye should do
T'will make the wassail a swinger.

And so part I from ye hence
As free from offence
As when we did innocent meet here.

***********************

With sincere apologies to Robert Herrick and his poem, Twelfth Night :)

Recipe for Twelfth Night King Cake from The Great British Bake Off: How to Bake: the Perfect Victoria Sponge and other Baking Secrets.

Hope you enjoyed your weekend. Back soon. x

Sunday, 20 October 2013

Chocolate, courgette & macadamia nut cake


Last month I promised you another courgette cake recipe. While I was leafing through my collection of recipes torn from magazines and newspapers, I came across one which I hadn't made before. The original used rapeseed oil and hazelnuts but I didn't have either of those so I substituted what I did have in my store cupboard. I also changed the method slightly and have included a more helpful indication of how much courgette you'll need. Ironically, after the summer glut, I didn't have enough courgettes in the garden so had to buy some! I also had to buy dark chocolate and came across some 150g bars in the supermarket which were reduced to the bargain price of 30p! The line is being discontinued but they still had a best before date of 2015. Needless to say I bought several bars as it's a pretty safe bet I'll be making something with chocolate over the next year :)


200g dark chocolate
2 large eggs
150ml vegetable oil
200g grated courgette
200g self-raising flour
120g caster sugar
50g macadamia nuts, finely chopped
4tbsp amaretto

  1. Preheat the oven to 180C/160 Fan/Gas 4.
  2. Melt the chocolate in a bowl over a pan of simmering water.
  3. Put the eggs and oil in a bowl and whisk until light and fluffy.
  4. Add the grated courgette and gently stir into the egg/oil mixture.
  5. Combine the flour, sugar and a pinch of salt and add to the courgette mixture.
  6. Then add the macadamia nuts and melted chocolate. Stir until completely mixed through.
  7. Pour into a 20cm (8") cake tin and bake for 45 minutes until the cake is cooked and feels firm but springy.
  8. Leave in the tin and, while the cake is still warm, pierce all over with a skewer and pour over the amaretto.
  9. Leave the amaretto to soak in for a few minutes and then turn out and allow to cool.

We ate it at room temperature one day when it was lighter and fluffier, and out of the fridge the next day when it seemed richer and denser (I preferred it this way). It's not as sweet or chocolatey as I expected so would be good with a chocolate icing. I served it drizzled with more amaretto and some cream. Yum yum!

*********************************************


Before I go, I wanted to share these photos of the sky taken at about 7.30 one morning this week. Amazing. Stunning.

Enjoy the rest of your weekend. x

Sunday, 8 September 2013

Lemon & maple syrup courgette cake


Last time I said I'd share the recipe for this courgette cake which I've made several times and is always reliable. It comes from the Maple Syrup Cookbook by Ken Haedrich which was given to me by my penfriend several years ago. Being American, the book uses cup measures but I've converted it all into standard measurements for you.

Ingredients
3 eggs
240ml maple syrup
120ml vegetable oil
1 tsp vanilla extract
Zest of 1 lemon
100g grated courgette
300g plain flour
1 tbsp baking powder
1/2 tsp salt


  1. Preheat the oven to 180C/160 Fan/Gas 4.
  2. Beat the eggs for 2 minutes, then gradually add the maple syrup, oil, vanilla extract and lemon zest. 
  3. Add the flour, baking powder and salt and stir until just combined. Pour into a prepared tin - I usually use a 1lb loaf tin with a ready-made liner but used a round tin this time so that it could be filled with lemon curd.
  4. Bake for 50-60 minutes.


De-licious. Well, usually anyway. This time I used some roasted pecan pancake syrup which needed using up - we weren't keen on it as a pancake syrup but I thought the pecan might add a little something extra. However, although the texture of the cake was fine, it lacked flavour so I'll be sticking to maple syrup in future. To add some extra flavour, I split the cake and filled it with lemon curd and also drizzled it with lemon syrup (warm lemon juice and sugar).

So, that's my courgette cake recipe. Do you have one you could recommend? I actually made another one yesterday which includes chocolate but I'll tell you about it another time. First it's back to our travels. x

Sunday, 5 May 2013

Birthday girl


Today was Chickpea's birthday. She is now older than I was when I gave birth to her. Which is weird. And scary.

But she's still my baby.

She thought she wasn't going to have any presents to open this morning as that nice Amazon has been a bit tardy and not delivered them yet. However, I'd sneaked an owl necklace and a pair of cat socks in without her knowing. Our friends from Oxfordshire showed up too with some gifts. As we hadn't seen them in a while that was a real treat in itself. They have a 5 year old who kept us all amused by dressing up in Chickpea's shoes and playing 'beauty parlour' by painting everyone's nails. I do wish they lived closer.


For once, I decided to make Chickpea's cake. She's had the same kind from Marks and Spencer since she was little and no amount of persuasion will convince her to have something different. 'It's tradition!' is a constant cry in our house! Well, at least I had a clear idea of what was expected.

I used Nigella's recipe for a Victoria Sponge from How to Eat to make 3 layers and then sandwiched them together with vanilla buttercream and homemade crab apple and blackberry jam. It was then covered with white fondant icing. It was the first time I'd decorated a cake this way and I rolled the icing out a bit thin but luckily some ribbon and a few butterflies and flowers hid the worst! And you can't beat a bit of edible glitter - there'd have been a lot more if Chickpea had had her way!


For the last few years we've gone out to restaurants for birthdays but this year we decided to have a celebration at home. In total, there were 7 of us: me, Chickpea, her boyfriend, his parents and my parents. Mum helped me with the food and between us we served up chicken casserole, roast potatoes, mini corn on the cob and minted peas. For dessert, as well as birthday cake, there were strawberries and cream. Lots of chatter and lots of laughter.

And now the house is quiet. Chickpea has gone to spend the week with her boyfriend and will be back Friday. I'll be back tomorrow with more news and photos from this long bank holiday weekend.

But, of course, I can't leave without saying, Happy Birthday darling. x

Sunday, 31 March 2013

Repurposing cake


Every year my Mum makes us a small Christmas cake but, this year, we just seemed to have so much food in the house that we never got around to eating it. When it was still lingering in the cupboard in February, I had a flash of inspiration: why not repurpose it as a Simnel cake? I could then devote my time to decorating rather than baking.


On Good Friday I started the transformation. The first step was to gently peel off all the old icing and marzipan. Luckily it came away quite easily without causing too much damage to the cake underneath. Looks yummy already - Mum makes the best Christmas cake ever!


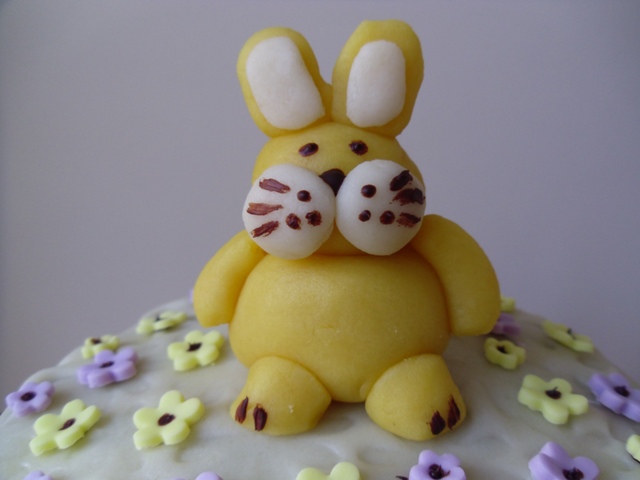
Originally I planned to leave the sides uncovered like the other Simnel cakes I'd seen. However, as they were quite sticky from the jam Mum had used to stick on the original decoration, I decided to recover them with fresh marzipan. The top and sides were then embossed with a PME impression mat. It's at this point that the idea of a traditional Simnel cake was abandoned and I went with a decorated Easter cake instead. Much more opportunity for prettifying!


The flowers were made from white fondant icing coloured with Sugarflair paste concentrate: the colours were melon and grape violet. I only used a tiny amount, dipping a cocktail stick in the pot and then kneading the colour through the icing. There was far too much icing for this cake so the remaining flowers and the butterflies will be used for other projects.


Making Easter Bunny (pattern from an old Asda magazine) was my favourite part. He's made from white and yellow marzipan and the details were painted with dark chocolate. The flower centres are chocolate too.


And finally, the finishing touch of a couple of pretty ribbons and it's all ready for the reveal...


Ta-dah!!! I'm really pleased with the way it turned out. Not what I'd planned at all but sometimes you have to go with the flow and where the inspiration takes you. It's also made me want to have a go at a proper iced cake. Chickpea's birthday is in May so you never know.


OK, all that remains is for me to wish everyone a very Happy Easter! Hope you're enjoying the long weekend and the sunshine. x

Saturday, 16 February 2013

Lemon bakewell & 'the package'


When I opened the Christmas present from my friend, I felt completely overwhelmed by her generosity. She had bought us a £50 theatre voucher from the Gift for Two range that you find in high street stores. For someone who loves theatre, this was the perfect gift. Last weekend, Chickpea and I excitedly looked through the list of shows at the eligible theatres, picked out our favourite, the date and even the seats. I then phoned the special hotline number to book it. First obstacle, the show was not part of 'the package'. They sent us a list and it became apparent that only a small selection of  shows was part of 'the package'. Not only that but (second obstacle) only a small selection of dates for each show was part of 'the package', hardly any of them on a weekend. The final obstacle came when, having finally managed to decide on a show from the limited selection and on a date when I could get a day off work, we couldn't even have the seats I'd picked out as, you guessed it, they were not part of this pesky package!

I'm sure we'll have a wonderful time seeing The Mousetrap in Liverpool in April. However, it could have been a much less frustrating experience. If you're thinking of buying one of these gifts, please just be aware of its limitations.  


Anyway, after these frustrations, what else was there to do but bake cakes? With most of the jar of lemon curd left over from the pancakes, I decided to make lemon bakewell tart. The recipe doesn't give the ingredients for the pastry so I had to find another source and ended up using the one in The Great British Bake Off: How to Bake. I was clearly having one of those days though as the pastry didn't go according to plan and I just couldn't get it to roll out large enough to fit my rectangular tin without cracking. Aagh!

After a short break for foot stamping and cursing a rethink, I substituted a smaller square tin. However, I still had lots of pastry left so decided to make individual tarts like those in the Bake Off book. I used my largest cookie cutter to make circles, and rolled them out a little bit more so they would line the bottom and sides of each hole of a silicone muffin tin.

When the pastry came out of the oven from blind baking, the ones in the muffin tin looked far better so I filled those first and used the leftover mixture for the square tin.


And here they are! The individual tarts came out beautifully and slid out of the silicone tin with ease and no sign of a soggy bottom! They tasted pretty good too, particularly when served with the remains of the lemon curd creme fraiche - yum!

And the square tin? Well, the tart came out and, again, no soggy bottom. There were a few moments while trimming off the excess pastry around the top when I felt like I was part of a Carry On film. As I hacked and sawed at the pastry, bits flew off ricocheting into other bits, travelling all over the worktop, me and the floor! Despite that, it was equally as delicious. A bit on the flat side because I'd used most of the filling for the individual tarts but this seemed to give it a chewy texture with a crisp top.

And so the message for today? All's well that ends well :-)

Hope you're having a lovely weekend. We're have a day out tomorrow and I can't wait! Hopefully I'll get some good photos and will share later in the week. x

Saturday, 5 January 2013

Cyclamen, clementines & cake


This Christmas I wanted something different to the usual vase of flowers for my table. I've always thought that piles of clementines with their leaves looked very Christmassy but the problem is that we don't actually like them that much.

Then Gillian posted about the orange cake her husband had made and I realised I could still have my clementines and eat them!


I already had the gold platter and the fairy lights from the Woodland Vase. The cyclamen was from Asda and came with the gold star pot. Grapes were added to fill out the display but also to tempt Chickpea to eat fruit instead of all the chocolate she was likely to receive! I added a few baubles for some extra colour.

I was really pleased with the way it turned out and it looked lovely on my table and lit up at night, though I think I ended up eating more of the grapes than Chickpea!


And so to the cake. Originally I planned to make Nigella's delicious Clementine Cake from her book How to Eat, which I've made a couple of times. But, while I was browsing through my file of recipes looking for a special dessert for New Year's Day, I came across a Fruity Ricotta Cake from the Morrisons magazine which used slices of the clementines to decorate the top and sides. It looked so pretty I couldn't resist.

I used a reusable cake tin liner for the first time and was very impressed. The cake came out of the tin beautifully - just slid out without sticking at all. In fact the liner stayed 'stuck' to the tin. I'll definitely be using it again.


This was the finished cake. I thought it would be more like a cheesecake but it was actually more like the clementine cake with a moist almondy taste and texture.

(Hmm, I'm now wishing I'd taken more time to get a better photo and that doily was definitely a mistake. But the hungry hoards were waiting!)


Whilst on the subject of cakes, when I went back to work on Thursday, I was finally able to open my Secret Santa present after missing out before Christmas with my back. Well, it was worth the wait - look what Santa brought me! He clearly knows me very well :-)

We've just finished taking down all the decorations and clearing Christmas away for another year. There's a couple more mentions of it to come on here though as I've got a recipe to share with you and and another gift I made for friends. Back in a day or two.

Sunday, 4 November 2012

Bonfire Night: Parkin


My second Bonfire Night recipe is Parkin: a dark, chewy, crumbly, gingery cake. It can be bought all year round but is most traditionally associated with this time of year. The recipe is also known as Yorkshire Parkin and contains treacle. There is another version, Lancashire Parkin, which is much lighter in colour and texture because it contains both treacle and golden syrup.

Oh dear, I can feel the spirits of my Lancashire ancestors disowning me but, whisper it, I think I prefer the Yorkshire version*. However, as I've played around with the recipe by altering the spices, adding extra ingredients to make it even more gingery, and I'm a Lancashire girl, maybe they'll forgive me if I call it Larkshire Parkin?

By far the hardest part of this recipe is that, after baking, you should leave it to one side for a few days to allow the flavour to develop. It's worth the wait, I promise!

Larkshire Parkin

175g treacle
150g butter
100g dark muscovado sugar
3 pieces of stem ginger, coarsely grated
1 teaspoon fresh ginger, finely grated
175g plain flour
1 teaspoon bicarbonate of soda
2 teaspoons ground ginger
1 teaspoon ground cinnamon
1 teaspoon freshly grated nutmeg
1/4 teaspoon mace
275g medium oatmeal
1 egg
150ml milk
1 tablespoon ginger syrup (from the jar of stem ginger)

1. Preheat the oven to 180C/160 Fan/350F/Gas 4
2. Put the treacle, butter and sugar into a pan and heat gently until the butter and sugar have melted. Cool slightly. Add the grated stem ginger and fresh ginger.
3. Sift the flour, bicarbonate of soda and spices into a large bowl and add the oatmeal.
4. Mix the egg, milk and ginger syrup together in a separate bowl.
5. Add the egg mixture and treacle mixture to the dry ingredients and stir well.
6. Pour into a lined 20cm square deep tin. The mixture is quite runny but don't worry - as it bakes the oatmeal will absorb the moisture. Bake for 55 minutes or until firm.
7. Cool in the tin for 10 minutes before turning out.
8. When completely cold, wrap in greaseproof paper and store for a few days to allow the flavour to develop.


Parkin can be served on its own but it's also traditionally served sliced with butter. However, I still had some of the maple buttercream from the Halloween muffins so Chickpea and I decided to have a taste off.


Two slices were spread with butter (thickly for Chickpea and a thin scraping for me) and two with the buttercream. Which would we prefer? Well, I was expecting the buttercream to win but, as Chickpea noted, the maple flavour somehow seemed to minimise the ginger of the parkin. We were both unanimous that butter was the perfect combination.

This is the first time I've made parkin and the first time I've tasted it in many years but I'll definitely be making it again: I'd forgotten just how delicious it is.

I'd love to know what you think if you decide to make this recipe. However, if you don't fancy trying parkin but like the idea of a ginger cake, my all-time favourite ginger cake recipe is Preserved Ginger Cake with Lemon Icing by Delia Smith. I've made it lots and lots of times and it's always absolutely yummy - mmm, mmm!

*Lancashire-Yorkshire rivalry has been around for several centuries - see the War of the Roses.

Tuesday, 30 October 2012

Halloween butternut squash & pecan muffins


As a family we've never been big on Halloween. I come from a generation before it really started to catch on in the UK. About 30 years ago, inspired by American TV shows and films, I tried trick or treating with a couple of friends. The reaction was not good and one lady was particularly unimpressed: "You should be ashamed of yourself going round the streets beggin'. I'll be tellin' your mother!"

Needless to say, that was my first and last attempt. I didn't go trick or treating again until Chickpea was small and we stuck to close friends and neighbours. Of course, she loved it and particularly enjoyed dressing up as a witch in a black bin bag or as a cat with alice band ears and a clip on tail. The last time we trick or treated was probably 10 years ago.

However, we do consider ourselves a Halloween friendly household and I love to see the little ones out in their costumes. This year I decided it was time to embrace Halloween and celebrate with some baking (any excuse!). Pumpkin was the obvious choice so I looked round my books and magazines for inspiration. These muffins are the result and have been created by taking elements from several different recipes.

I really enjoyed making them and hope you do too.


Butternut squash and pecan muffins

Makes 12

150g butter
225g caster sugar
2 eggs
225g self-raising flour
1 teaspoon bicarbonate of soda
1 teaspoon ground ginger
1 teaspoon ground cinnamon
1/4 teaspoon grated nutmeg
150ml sour cream
125g grated butternut squash
75g pecans, chopped

1. Preheat the oven to 180C/160 Fan/350F/Gas 4
2. Cream the butter and sugar until light and fluffy.
3. Add the eggs one at a time, mixing well after each addition.
4. Sift or mix together the flour, bicarbonate of soda and spices.
5. Add the grated squash to the sour cream.
6. Fold in the flour mix and sour cream mix alternately into the butter mix until just combined.
7. Fold in the pecans.
8. Spoon into the paper cases and bake for 15-20 minutes until well-risen and firm. Put onto a wire rack to cool.


They're delicious plain as shown here. However, this is Halloween so some decoration was called for. I chose to make a butter and cream cheese topping to decorate.

Maple butter and cream cheese topping
100g cream cheese
50g butter
1.5 tablespoons maple syrup
250g icing sugar

1. Beat the cream cheese and butter together until smooth.
2. Add the maple syrup and icing sugar and again beat until smooth.
3. Add a generous swirl to each muffn and decorate with sprinkles and sweets.